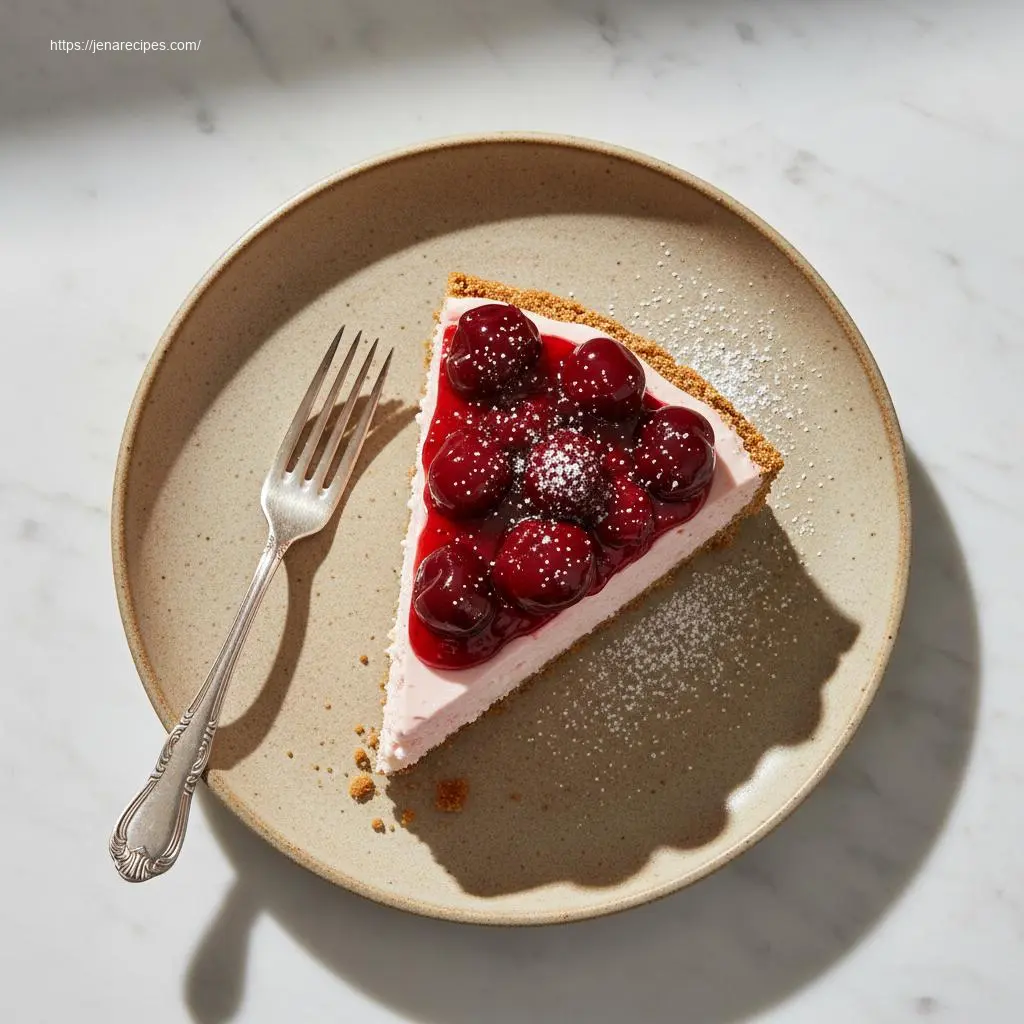
Let’s dive into a world of delicious desserts without ever needing to turn on your oven! Today, we’re going to talk all about making the most amazing no-bake cherry cheesecake. This isn’t just a dessert; it’s a super easy, super yummy treat that anyone can make, even if you’re new to baking. Get ready to impress your friends and family with this delightful no-bake cherry cheesecake!

I. Introduction to No-Bake Cherry Cheesecake
A. The Allure of No-Bake Desserts
Imagine a sunny day, or maybe a busy weeknight. The last thing you want to do is stand over a hot oven, right? That’s where no-bake desserts swoop in like superheroes! They’re incredibly convenient and super popular, especially when the weather warms up. No-bake treats are fantastic because they save you time, keep your kitchen cool, and often require just a few simple steps. They’re perfect for those busy schedules when you still want something sweet and special.
B. Why Cherry Cheesecake?
Now, out of all the amazing no-bake treats, why focus on no-bake cherry cheesecake? Well, cherry is a classic for a reason! The bright, tangy taste of cherries pairs perfectly with the creamy, rich goodness of cheesecake. It’s a flavor combination that almost everyone loves, bringing a touch of elegance and a burst of fruitiness to every bite. Plus, it just looks so pretty with that vibrant red topping!
C. Introducing the “Effortless” No-Bake Cherry Cheesecake
So, what makes *this* no-bake cherry cheesecake recipe stand out? We call it the “effortless” no-bake cherry cheesecake because it’s incredibly simple to make, uses minimal ingredients you probably already have, and comes together super fast! It’s truly perfect for beginners, busy parents, or anyone who wants a show-stopping dessert without a lot of fuss. You won’t believe how easy it is to create such a delicious no-bake cherry cheesecake!
D. What Readers Will Learn
In this post, you’ll learn everything you need to know to make your own “effortless” no-bake cherry cheesecake. We’ll cover how to make it step-by-step, share some amazing tips for success, and even give you ideas for fun variations. Get ready to become a no-bake dessert wizard!
II. The Magic of No-Bake Cheesecake: Why It Works
A. Understanding the “No-Bake” Principle
How does a cheesecake get firm and delicious without an oven? It’s all about chilling! Instead of baking at high temperatures to set, no-bake cheesecakes rely on refrigeration and special ingredients that firm up when they get cold. Think of it like making Jell-O – you mix it, put it in the fridge, and it becomes solid! The same magic happens with your no-bake cherry cheesecake.
B. Key Ingredients for No-Bake Success
The secret to a perfectly set no-bake cherry cheesecake lies in its ingredients. Here are the stars of the show:
- Cream Cheese: This is the heart of your cheesecake! It gives you that tangy, rich flavor. Using full-fat cream cheese is key for the best texture.
- Sweetened Condensed Milk: This magical ingredient is super thick and already sweet! It helps sweeten the cheesecake and also helps it firm up beautifully.
- Whipped Topping (like Cool Whip) or Heavy Cream: These add lightness and airiness, making your filling wonderfully smooth and fluffy. If you use heavy cream, you’ll whip it yourself until it’s light and airy.
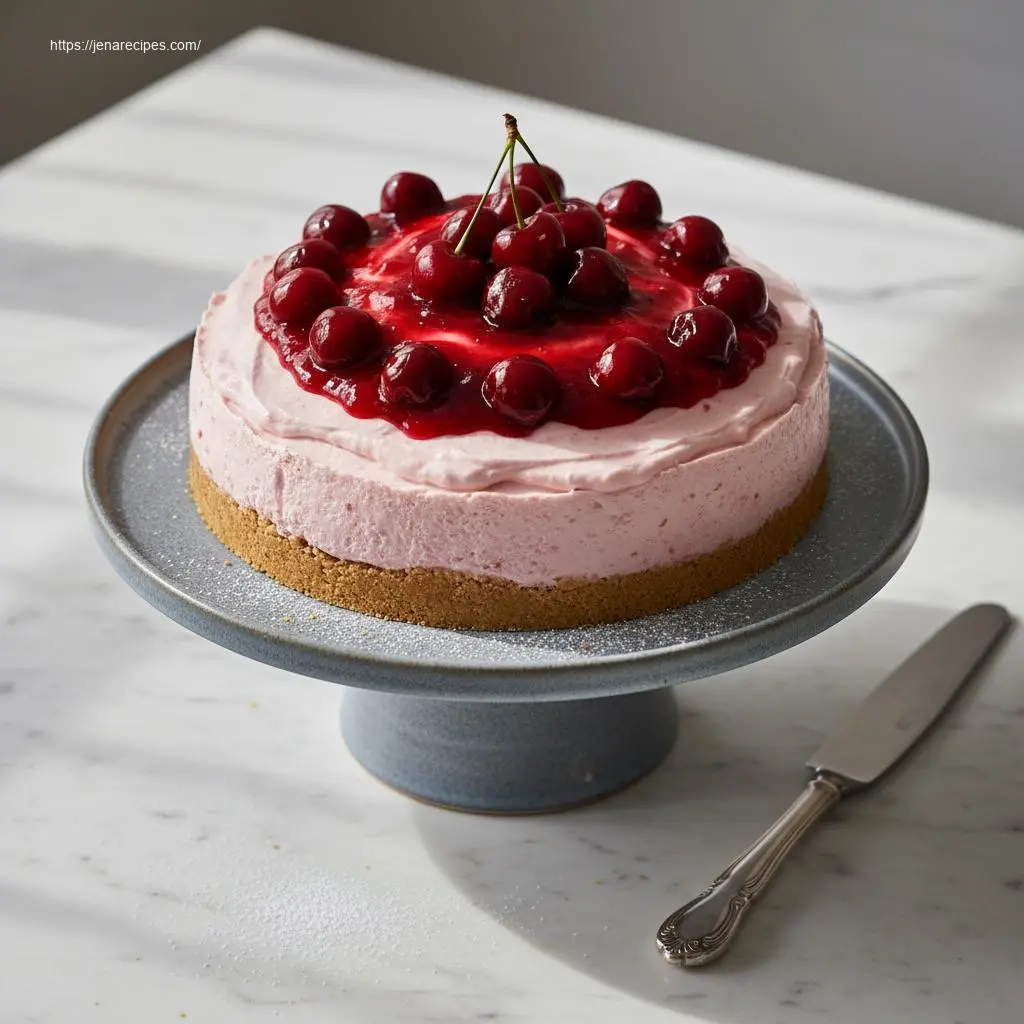
- Crust Ingredients: Usually graham cracker crumbs, melted butter, and a little sugar come together to form the perfect sturdy base for your no-bake cherry cheesecake.
These ingredients work together to create a creamy mixture that firms up perfectly when chilled, giving you a wonderful no-bake cherry cheesecake.
C. Advantages Over Traditional Baked Cheesecake
Why go no-bake? There are so many reasons to love this method:
- No Cracking Issues: Traditional baked cheesecakes can sometimes crack on top, which can be frustrating. With a no-bake version, you don’t have to worry about that at all!
- Saves Time and Energy: No preheating, no long bake times. You just mix and chill, saving you precious time and keeping your energy bills down.
- Accessibility for All Skill Levels: You don’t need to be a master baker to make a fantastic no-bake cherry cheesecake. If you can mix and stir, you can make this dessert! It’s truly effortless.
III. Your “Effortless” No-Bake Cherry Cheesecake: The Recipe Breakdown
Are you ready to create your own absolutely delicious “effortless” no-bake cherry cheesecake? Let’s break down exactly what you’ll need and how to put it all together.
A. Essential Ingredients You’ll Need
Gather these simple ingredients, and you’ll be well on your way to a perfect no-bake cherry cheesecake:
- For the Crust:
- 1 ½ cups graham cracker crumbs (about 10-12 full graham cracker sheets)
- ¼ cup granulated sugar
- ½ cup unsalted butter, melted
- For the Filling:
- 2 (8-ounce) blocks full-fat cream cheese, softened (this is super important!)
- 1 (14-ounce) can sweetened condensed milk
- 1 teaspoon vanilla extract
- 1 tablespoon fresh lemon juice (optional, but adds a nice tang!)
- 1 (8-ounce) tub frozen whipped topping, thawed (like Cool Whip), or 2 cups heavy cream, whipped
- For the Topping:
- 1 (21-ounce) can cherry pie filling
B. Step-by-Step Instructions for the Perfect Crust
The crust is the delicious foundation for your no-bake cherry cheesecake. Here’s how to make it:
- Crushing Graham Crackers: Put your graham crackers into a Ziploc bag and crush them with a rolling pin until they are fine crumbs. Or, you can pulse them in a food processor for a few seconds.
- Mixing with Butter and Sugar: In a medium bowl, mix the graham cracker crumbs and sugar. Pour in the melted butter and stir until all the crumbs are evenly coated and look like wet sand.
- Pressing into Pan: Get a 9-inch pie dish or a 9-inch springform pan. Pour the crumb mixture into the bottom of the pan. Use the back of a spoon or the bottom of a flat glass to press the crumbs firmly and evenly into the bottom and slightly up the sides of the pan. Make sure it’s packed tightly!
- Chilling: Pop the crust into the refrigerator for at least 15 minutes while you make the filling. This helps it firm up and prevents it from crumbling when you slice your no-bake cherry cheesecake.
C. Crafting the Smooth & Creamy Filling
Here’s where the magic happens for your smooth no-bake cherry cheesecake filling:
- Softening Cream Cheese: This is the most crucial step! Make sure your cream cheese is *really* soft. Leave it out on the counter for about an hour before you start, or gently warm it in the microwave for 15-20 seconds. If it’s not soft, your filling will be lumpy.
- Whipping Process: In a large mixing bowl, beat the softened cream cheese with an electric mixer on medium speed until it’s completely smooth and fluffy, with no lumps. This might take 2-3 minutes.
- Mixing in Other Ingredients: Pour in the sweetened condensed milk, vanilla extract, and lemon juice (if using). Beat on low speed until just combined. Don’t overmix!
- Folding in Whipped Topping/Cream: If using thawed whipped topping, gently fold it into the cream cheese mixture using a spatula until no streaks remain. If using heavy cream, whip it in a separate bowl until stiff peaks form, then gently fold that into the cream cheese mixture. Folding ensures your filling stays light and airy, giving you a wonderful no-bake cherry cheesecake.
- Achieving Desired Consistency: You should now have a light, fluffy, and smooth cream cheese mixture. Taste it to make sure it’s just right for you!
D. Adding the Irresistible Cherry Topping
The vibrant cherry topping makes your no-bake cherry cheesecake truly, well, cherry!
- Applying Canned Filling: Once your filling is in the crust, simply spoon the canned cherry pie filling over the top.
- Even Distribution: Gently spread the cherry pie filling evenly across the top of the cheesecake with the back of a spoon or a spatula, right to the edges.
E. Chilling for Perfection
This is a step you absolutely cannot skip for your no-bake cherry cheesecake!
- Importance of Adequate Chilling Time: Once the cheesecake is assembled, cover it loosely with plastic wrap and place it in the refrigerator. It needs to chill for at least 4 hours, but overnight is even better. This chilling time is essential for the cheesecake to firm up completely and be easy to slice. Don’t rush it! A properly chilled no-bake cherry cheesecake is key.
IV. Pro Tips for Your “Effortless” No-Bake Cherry Cheesecake
Want to make your “effortless” no-bake cherry cheesecake truly perfect? These pro tips will help you every time.
A. Ingredient Quality Matters
For the best flavor and texture, use good quality ingredients. Especially for the cream cheese – stick to full-fat block cream cheese, not the spreadable kind in a tub. This will give your no-bake cherry cheesecake that rich, classic taste and firm texture.
B. Don’t Rush the Chill Time
We can’t say it enough: chilling is crucial! Your no-bake cherry cheesecake needs time for the ingredients to fully set and firm up. If you cut into it too early, it might be a bit soft or messy. Patience is a virtue here! At least 4 hours, but overnight for the absolute best results.
C. Achieving a Smooth Filling
Lumpy cheesecake filling is no fun! Here’s how to avoid it:
- Softened Cream Cheese: Always, always, *always* start with cream cheese that is truly at room temperature and soft.
- Proper Mixing: Beat the cream cheese by itself first until it’s completely smooth before adding other liquids. Scrape down the sides of the bowl often. This ensures a silky smooth no-bake cherry cheesecake filling.
D. Serving Suggestions & Garnish Ideas
While your no-bake cherry cheesecake is already a star, a few finishing touches can make it even more special:
- Fresh Mint: A sprig of fresh mint adds a lovely bit of green contrast.
- Chocolate Shavings: A sprinkle of chocolate curls or shavings can be a sophisticated touch.
- Extra Whipped Cream: A dollop of fresh whipped cream on each slice is always a welcome addition.
- Fresh Cherries: If fresh cherries are in season, a few placed next to the slice look beautiful.
E. Storage and Make-Ahead Tips
Good news! Your no-bake cherry cheesecake is great for making ahead and stores well.
- How Long It Lasts: Store your cheesecake, covered loosely, in the refrigerator for up to 3-4 days.
- Best Way to Store: Keep it in an airtight container or covered with plastic wrap when not serving to prevent it from drying out or picking up other smells from the fridge.
V. Variations and Customizations for Your No-Bake Cheesecake
The beauty of this “effortless” no-bake cherry cheesecake recipe is how easy it is to change up and make your own!
A. Crust Alternatives
Get creative with your crust! Instead of graham crackers, try:
- Oreo Crumbs: For a chocolatey twist, use crushed Oreo cookies (cream filling included!).
- Vanilla Wafers: These make a lighter, sweeter crust.
- Shortbread Cookies: Crushed shortbread adds a buttery, elegant base.
B. Other Fruit Topping Ideas
If cherries aren’t your favorite, or if you just want to try something new, this no-bake cherry cheesecake base works with almost any fruit topping:
- Blueberry: Use canned blueberry pie filling or a homemade blueberry compote.
- Strawberry: Fresh sliced strawberries or strawberry pie filling are deliciously sweet.
- Mixed Berry: A mix of raspberries, blueberries, and blackberries looks beautiful and tastes fantastic.
- Peach: Canned sliced peaches or peach pie filling.
C. Flavor Additions to the Filling
Want to jazz up the cheesecake filling itself?
- Almond Extract: A tiny drop (¼ teaspoon) of almond extract pairs wonderfully with cherry flavor.
- Lemon/Lime Zest: Grate a little lemon or lime zest into the filling for a brighter, more citrusy taste.
- Chocolate Chips: Fold in mini chocolate chips for a delightful texture and flavor surprise.
D. Individual Servings
Making individual mini no-bake cherry cheesecakes is super cute and perfect for parties!
- Using Ramekins: Press crust into the bottom of small ramekins, then add filling and topping.
- Muffin Tins: Line muffin tins with paper liners, press in crust, add filling, and chilling. Once firm, remove from the muffin tin for individual servings.
VI. Why This “Effortless” Recipe Will Be Your Go-To
You’ve learned all about making this “effortless” no-bake cherry cheesecake, and now you know why it’s going to be your new favorite go-to dessert!
A. Recap of Key Benefits
Let’s quickly recap all the amazing reasons to love this no-bake cherry cheesecake:
- Ease: It’s incredibly simple to make, even for total beginners.
- Speed: Comes together quickly, saving you time in the kitchen.
- Minimal Cleanup: Fewer dishes mean more time to enjoy your dessert!
- Crowd-Pleaser: Everyone loves the classic combo of cherry and creamy cheesecake.
B. Perfect for Any Occasion
This “effortless” no-bake cherry cheesecake is so versatile:
- Potlucks: It transports well and feeds a crowd.
- Family Dinners: An impressive-looking dessert that’s easy enough for a weeknight.
- Last-Minute Desserts: When you need something quick and delicious, this is it!
C. Encouragement to Try
So, what are you waiting for? You now have all the tools and knowledge to create your very own, absolutely delicious “effortless” no-bake cherry cheesecake. Go grab those ingredients, and get ready to enjoy a dessert that’s as fun to make as it is to eat. Your taste buds (and your family!) will thank you. Happy no-baking!
VII. FAQs about No-Bake Cherry Cheesecake
Got more questions about your no-bake cherry cheesecake? We’ve got answers!
Q1: How long does no-bake cheesecake need to chill?
A: Your no-bake cherry cheesecake needs at least 4 hours to chill and set properly. For the very best results and a perfectly firm cheesecake, chilling it overnight (8 hours or more) is highly recommended.
Q2: Can I use low-fat cream cheese?
A: It’s best to stick with full-fat block cream cheese for no-bake cherry cheesecake. Low-fat or whipped cream cheese often doesn’t set as firmly, which can result in a softer, less stable cheesecake. The full-fat version provides the best texture and richness.
Q3: What if my cheesecake filling is too thin?
A: If your no-bake cherry cheesecake filling seems too thin after mixing, it might be due to not softening the cream cheese enough (leading to lumps that trap air), or overmixing the whipped topping/cream. Don’t worry too much! As long as you used the correct ingredients, it should still firm up in the fridge. Just ensure adequate chilling time. If it still seems too loose after chilling, you can always serve it in pretty parfait glasses instead of slices.
Q4: Can I freeze no-bake cheesecake?
A: Yes, you can! To freeze your no-bake cherry cheesecake, make sure it’s completely chilled and set. Place it uncovered in the freezer for about an hour until firm. Then, wrap it tightly in plastic wrap, followed by a layer of aluminum foil. You can freeze it for up to 1-2 months. Thaw it overnight in the refrigerator before serving.
Q5: How long does no-bake cherry cheesecake last in the refrigerator?
A: Properly stored in an airtight container or tightly covered with plastic wrap, your no-bake cherry cheesecake will last for 3-4 days in the refrigerator.
Q6: Can I make this dairy-free?
A: Yes, you can adapt this no-bake cherry cheesecake recipe to be dairy-free! You would need to use dairy-free cream cheese alternatives (like Kite Hill or Violife), dairy-free sweetened condensed milk (often made with coconut milk), and a dairy-free whipped topping or whipped coconut cream. Always check labels to ensure all ingredients are dairy-free.
Q7: What kind of pan is best for no-bake cheesecake?
A: A 9-inch springform pan is ideal for the prettiest sliced no-bake cherry cheesecake, as the sides can easily be removed. A 9-inch pie dish also works perfectly well, especially if you plan to serve it directly from the dish.
Q8: Can I use fresh cherries instead of pie filling?
A: Absolutely! If you prefer fresh fruit, you can make a homemade cherry compote (cooking down fresh cherries with a little sugar and cornstarch) or simply pit and lightly sweeten fresh cherries to spoon over your no-bake cherry cheesecake. This gives a beautiful, fresh flavor!