Are you looking for a delightful sweet treat that brings a taste of Italy to your home? Mini Cannoli Cups are the perfect blend of crispy pastry and creamy ricotta filling. This bite-sized dessert not only satisfies your sweet tooth but also impresses your guests at parties and celebrations. With their charming presentation and delicious flavors, they are sure to be a hit with everyone. Making Mini Cannoli Cups is easier than you might think. With just a few simple ingredients and steps, you can have a delightful dessert ready to share with friends and family. Let’s explore why you should make this recipe and how it can become a favorite in your household.
Why Make This Recipe
Mini Cannoli Cups are a fantastic choice for many reasons. First, they are incredibly versatile. You can enjoy them as a dessert at a fancy dinner or a sweet treat at a casual gathering. Their bite-sized nature makes them easy to serve and fun to eat. Plus, they have a beautiful presentation that can dress up any occasion.
Another reason to make Mini Cannoli Cups is that they are simple to prepare. The recipe calls for easy ingredients that are often already in your pantry. With just a bit of time, you can create a dessert that tastes like it was made by a professional pastry chef. This means you can impress your guests without the stress of a complicated recipe.
Moreover, making Mini Cannoli Cups allows for creativity. You can customize the filling by adding different flavors or toppings according to your preference. Whether you choose to stick to the classic ricotta filling or experiment with chocolate, fruit, or nuts, the options are limitless. This flexibility makes the recipe suitable for everyone, including those with dietary restrictions.
Lastly, these delightful treats are perfect for sharing. Mini Cannoli Cups are great for potlucks, parties, or even as gifts. Their small size makes them easy to pop into your mouth, and people will surely love the combination of creamy and crunchy in every bite. So, gather your ingredients and let’s get started on making these delightful Mini Cannoli Cups!
How to Make Mini Cannoli Cups
Making Mini Cannoli Cups is a fun and rewarding experience. Here is a detailed guide on how to prepare this delicious dessert, step by step.
Ingredients:
- 1 container whole-milk ricotta cheese (15 oz., drained)
- 1/2 cup powdered sugar
- 2 tablespoons granulated sugar
- 1 teaspoon finely grated orange or lemon zest
- 1/2 teaspoon vanilla extract
- 1 box refrigerated pie crusts, softened as directed on the box (2 count)
- 3 tablespoons turbinado sugar (raw sugar)
- 1 teaspoon ground cinnamon
- 1/4 cup miniature semisweet chocolate chips or finely chopped pistachios
- Additional powdered sugar for dusting
Directions:
Preheat your oven to 425°F. This step is crucial for getting that perfect golden brown crust.
Prepare your work surface. Lightly flour it to prevent the dough from sticking. Unroll the pie crusts and place them on the floured surface.
Flavor the crusts. Sprinkle both pie crusts generously with turbinado sugar and ground cinnamon. Next, gently roll a rolling pin over the top of the pie crusts. This action will help press the sugar and cinnamon into the dough, enhancing the flavor.
Cut your pastry rounds. Using a 2½-inch round cookie or biscuit cutter, cut out pastry rounds. You may need to have a few extra rounds, so gently re-roll any leftover dough and cut out more circles until you have 48 pastry rounds.
Place in muffin cups. Gently press each pastry round into ungreased mini muffin cups. This technique shapes the dough perfectly for your cannoli cups.
Bake the cups. Place the muffin tin in the oven and bake the pastry for about 10 minutes, or until they are golden brown. Keep an eye on them to prevent burning.
Cool the cups. Once baked, allow the cannoli cups to cool completely in the pans for about 15 minutes. Afterward, carefully remove them to a wire rack to cool completely.
Prepare the filling. While the cups are cooling, you can make the creamy filling. In a large mixing bowl, beat the ricotta cheese, powdered sugar, granulated sugar, orange or lemon zest, and vanilla extract using an electric mixer on medium speed. Continue mixing until the texture is creamy and smooth.
Chill the filling. Transfer the filling into a 1-gallon zip-top resealable bag. Seal the bag and place it in the refrigerator until you are ready to serve.
Fill the cups. Just before serving, take the filling out of the refrigerator. Snip one corner off the bag and pipe approximately 1 tablespoon of filling into each cooled pastry cup.
Add toppings. Finally, sprinkle the cups with mini chocolate chips or finely chopped pistachios for that extra crunch. Dust with additional powdered sugar for a lovely presentation.
Serve immediately. Enjoy your delicious Mini Cannoli Cups with loved ones!
How to Serve Mini Cannoli Cups
When it comes to serving Mini Cannoli Cups, presentation is key. To elevate your dessert’s appearance, place the filled cannoli cups on a decorative serving platter. You can create a beautiful display by arranging them in a circular pattern or in rows. For an even more festive look, adorn the platter with some fresh fruit like berries or mint leaves.
If you want to make the experience even more enjoyable, consider serving them alongside a scoop of vanilla ice cream or a dollop of whipped cream. These additions offer a delightful contrast in texture and flavor. Drinks like espresso, coffee, or a light dessert wine pair wonderfully with these treats, enhancing the overall experience.
To make the occasion extra special, you can also consider making a themed event around Italian desserts. Serve your Mini Cannoli Cups alongside Tiramisu or Panna Cotta for a delightful Italian dessert spread.
How to Store Mini Cannoli Cups
To store Mini Cannoli Cups, it’s important to keep them in a way that maintains their crispy texture. If you have leftover pastry shells, you should store them separately from the filling. Place the cooled pastry cups in an airtight container at room temperature. They can stay fresh for about 2 to 3 days.
For the filling, keep it in the refrigerator in an airtight container or the resealable bag you prepared earlier. The filling can be stored for up to 3 days. When you are ready to serve again, simply fill the pastry cups with the chilled filling as needed. Avoid filling the cups too early, as they will become soggy if left filled for too long.
It’s best to assemble and serve the Mini Cannoli Cups fresh when you can. This way, you get that perfect crunchy texture along with the creamy filling every time.
Tips to Make Mini Cannoli Cups
Here are some helpful tips to ensure your Mini Cannoli Cups turn out perfectly:
Drain the Ricotta: Before mixing the filling, make sure to drain the ricotta cheese well. Excess liquid can make the filling watery and affect the texture.
Chill the Filling: It’s a good idea to chill the filling before piping it. Chilled filling holds its shape better and tastes incredibly refreshing.
Experiment with Flavors: Feel free to experiment with the filling by adding other flavors like chocolate chips, vanilla bean, or even a splash of liqueur for a more adult version.
Check Baking Time: Every oven is different. Keep an eye on the pastry cups while they bake. If they start to brown too quickly, you can lower the temperature slightly.
Customize Toppings: Get creative with toppings. Besides chocolate chips and pistachios, you can use crushed cookies, candied fruit, or even edible flowers for a unique touch.
Variation
If you want to vary your Mini Cannoli Cups, consider different fillings. Instead of traditional ricotta cheese, you could use mascarpone cheese for a richer taste. For a chocolate twist, mix in cocoa powder or melted chocolate into the filling. You can also try adding different extracts such as almond or peppermint to give a new flavor dimension.
Additionally, you could make a fruit-filled version by folding in chopped fruits like strawberries, mangoes, or blueberries. This variation is especially refreshing during warmer months and adds a vibrant color to your dessert table.
FAQs
1. Can I use homemade pie crust instead of refrigerated ones?
Absolutely! If you’re comfortable making your own pie crust, feel free to use a homemade version. Just ensure it’s rolled out thin enough to make the mini cups.
2. How can I make Mini Cannoli Cups ahead of time?
You can prepare the pastry cups and filling a day in advance. Store the baked cups in an airtight container at room temperature and refrigerate the filling. Assemble just before serving for best results.
3. Can I freeze Mini Cannoli Cups?
It’s best not to freeze filled Mini Cannoli Cups, as the texture will be affected. However, you can freeze the baked pastry cups. Thaw at room temperature before adding the filling.
4. What if I don’t have turbinado sugar?
If you don’t have turbinado sugar, you can substitute it with regular granulated sugar. While it won’t have the same crunch, the flavor will still be delicious.
5. How do I know if the pastry cups are done baking?
The pastry cups should be golden brown when done. If you notice they are browning too quickly, lower the oven temperature and keep checking for that perfect color.
By following this guide, you’ll be well on your way to impressing everyone with your homemade Mini Cannoli Cups. Enjoy the process and have fun sharing this delightful treat!
Print
Mini Cannoli Cups
- Total Time: 25 minutes
- Yield: 24 servings 1x
- Diet: Vegetarian
Description
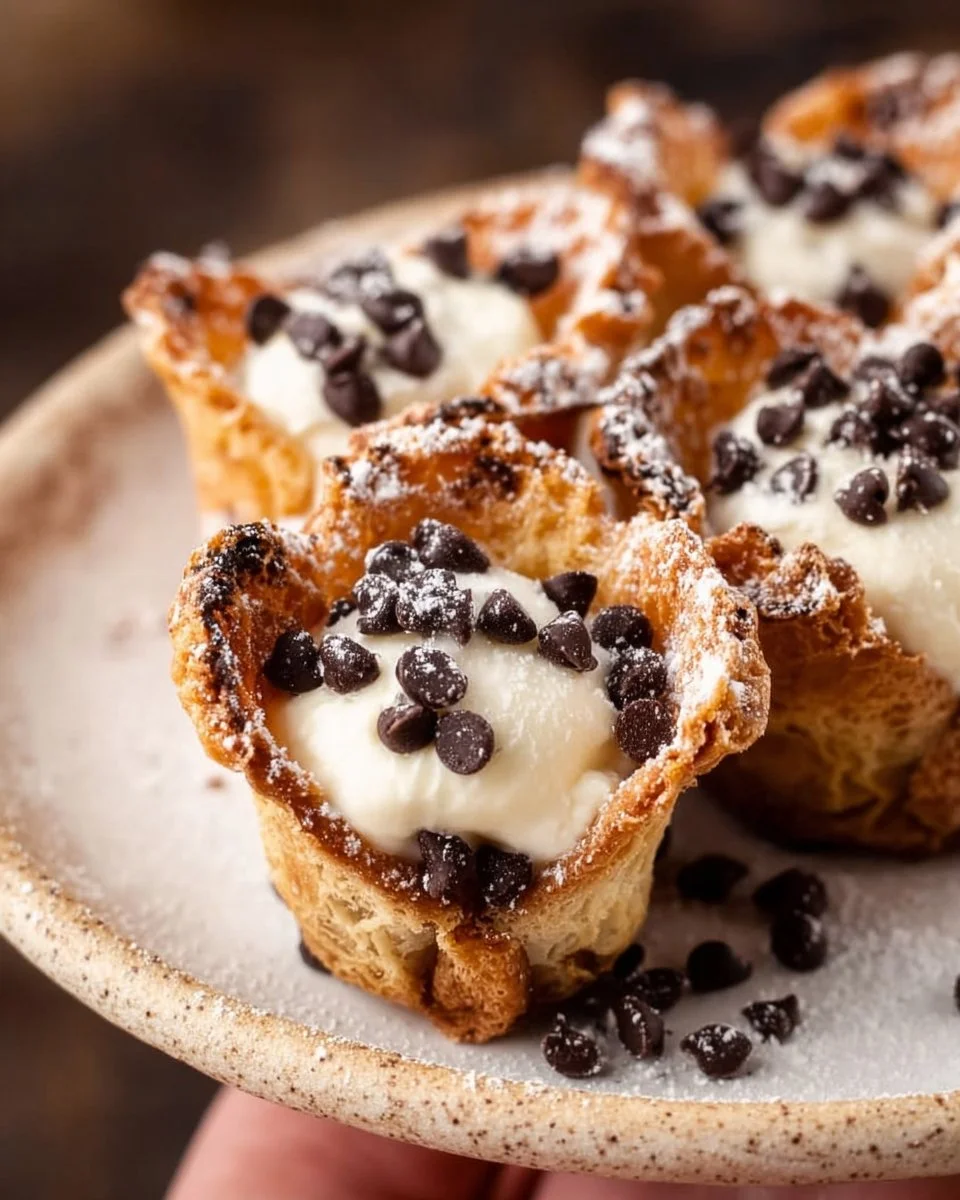
Delightful bite-sized Italian desserts featuring crispy pastry cups filled with creamy ricotta cheese and topped with chocolate or pistachios.
Ingredients
- 1 container whole-milk ricotta cheese (15 oz., drained)
- 1/2 cup powdered sugar
- 2 tablespoons granulated sugar
- 1 teaspoon finely grated orange or lemon zest
- 1/2 teaspoon vanilla extract
- 1 box refrigerated pie crusts (2 count)
- 3 tablespoons turbinado sugar
- 1 teaspoon ground cinnamon
- 1/4 cup miniature semisweet chocolate chips or finely chopped pistachios
- Additional powdered sugar for dusting
Instructions
- Preheat your oven to 425°F.
- Lightly flour your work surface and unroll the pie crusts.
- Sprinkle both pie crusts with turbinado sugar and ground cinnamon.
- Cut out 48 pastry rounds using a 2½-inch cookie cutter.
- Press each pastry round into ungreased mini muffin cups.
- Bake for about 10 minutes, until golden brown.
- Allow to cool for 15 minutes before transferring to a wire rack.
- Prepare the filling by beating the ricotta, powdered sugar, granulated sugar, zest, and vanilla until creamy.
- Chill the filling in a resealable bag.
- Pipe the filling into each cooled pastry cup just before serving.
- Top with chocolate chips or pistachios and dust with powdered sugar.
Notes
For best results, fill the pastry cups just before serving to maintain their crunch.
- Prep Time: 15 minutes
- Cook Time: 10 minutes
- Category: Dessert
- Method: Baking
- Cuisine: Italian
Nutrition
- Serving Size: 1 serving
- Calories: 150
- Sugar: 8g
- Sodium: 80mg
- Fat: 6g
- Saturated Fat: 3g
- Unsaturated Fat: 2g
- Trans Fat: 0g
- Carbohydrates: 19g
- Fiber: 1g
- Protein: 4g
- Cholesterol: 15mg
Keywords: dessert, cannoli, Italian, pastry, sweet treat