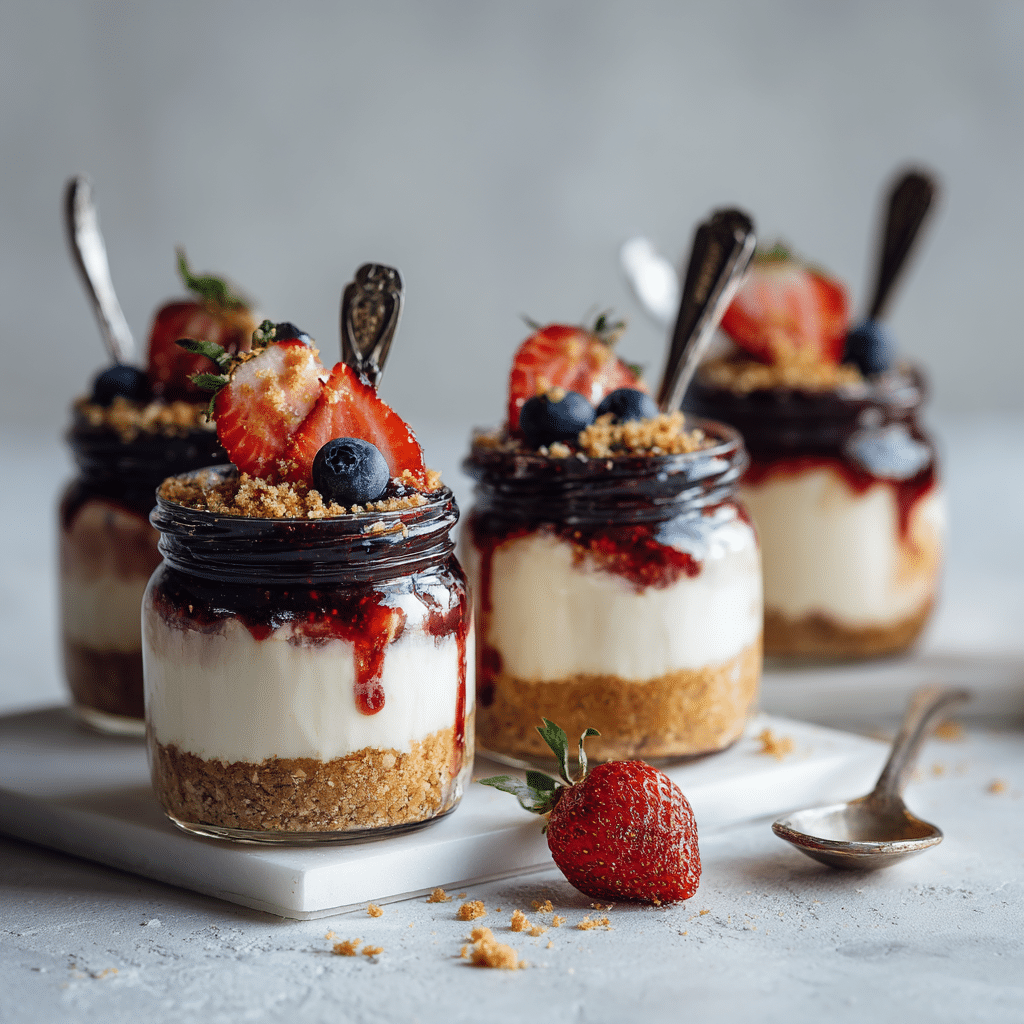
If you’ve ever wished for a dessert that’s rich, pretty, and fast, these no-bake cheesecake jars check every box. They’re the kind of treat that looks fancy enough for a dinner party but is simple enough to whip up during naptime. In this post, I’m sharing my favorite way to make no-bake cheesecake jars, plus smart tips for storage, prep, and avoiding common mistakes. Whether you’re craving creamy fruit-topped layers or planning for a party, this recipe brings flavor and ease together beautifully. Let’s dive into the story behind these jars and why they’ve become a go-to in my kitchen.
Table of Contents
My Favorite No-Bake Cheesecake Jars (And Why You’ll Love Them Too)
The story behind the jars
The very first time I made no-bake cheesecake jars, it was a spur-of-the-moment thing. It was a rainy Saturday, my daughter had just finished building a pillow fort, and we were both in need of a cozy kitchen project. I didn’t have time to bake, and turning on the oven felt like too much effort. So I grabbed what I had: cream cheese, graham crackers, and a jar of strawberry jam. Ten minutes later, we had layered jars of creamy, dreamy cheesecake chilling in the fridge, and we were both smiling from ear to ear.

These jars take me back to my childhood. I grew up in a big family, and my grandma’s desserts were always quick and comforting. No-bake recipes were her specialty, and these jars feel like a sweet little tribute to her no-fuss approach. Now, as a busy mom with only bits of quiet time between work and playdates, no-bake cheesecake jars are one of my favorite shortcuts to something special.
Print
No-Bake Cheesecake Jars : Creamy, Cute, and Ready in Minutes
- Total Time: 20 minutes
- Yield: 6 to 8 jars
Description
Creamy, customizable no-bake cheesecake jars with graham cracker crust, smooth filling, and endless topping options.
Ingredients
Crushed graham crackers
Melted butter
Pinch of cinnamon or brown sugar (optional)
Softened cream cheese
Vanilla extract
Whipped cream or sweetened condensed milk
Powdered sugar (if not using condensed milk)
Lemon zest or crushed cookies (optional mix-ins)
Fresh berries, fruit preserves, or chocolate ganache for topping
Alternative crust options: Oreo crumbs, vanilla wafers, or gingersnaps
Instructions
1. Prepare jars (4 to 8-ounce mason jars or small glasses).
2. Mix crushed graham crackers with melted butter and optional cinnamon or brown sugar.
3. Press crust mixture into the bottom of each jar and refrigerate.
4. Beat softened cream cheese until smooth.
5. Add powdered sugar or condensed milk and vanilla, mixing until combined.
6. Fold in whipped cream or whipped topping gently.
7. Layer filling over crust in jars.
8. Top with jam, fruit, ganache, or desired toppings.
9. Chill in the refrigerator at least 4 hours (overnight preferred) before serving.
Notes
Chill at least 4 hours; overnight yields best texture.
Store sealed in fridge for up to 5 days; add fresh fruit just before serving.
Freeze without toppings for up to 2 weeks; thaw overnight in fridge.
Use wide-mouth jars for easier layering.
Avoid using cold cream cheese to prevent lumps.
Do not overmix the filling to maintain creamy texture.
- Prep Time: 20 minutes
- Cook Time: 0 minutes
- Category: Dessert
- Method: No-Bake
- Cuisine: American
Nutrition
- Serving Size: 1 jar
Keywords: no-bake, cheesecake, jars, easy dessert, make-ahead, fridge dessert, quick
What makes no-bake cheesecake jars a must-try
No-bake cheesecake jars aren’t just easy, they’re genius. You don’t need to heat up your kitchen, and there’s no worry about cracking, overbaking, or water baths. They come together with minimal ingredients and no fancy tools. Best of all, they’re portioned perfectly for sharing, or saving. The texture is smooth and tangy, just like a classic cheesecake, but lighter and fluffier thanks to whipped cream or condensed milk.
They’re also super customizable. Want to use blueberry topping instead of strawberry? Go for it. Prefer a chocolate crust? Crush up some Oreos. And because they’re served in jars, they’re great for parties, lunchbox treats, or just grabbing one after dinner. For more no-bake inspiration, you might also enjoy these no-bake pecan pie balls or blueberry cheesecake dessert.
Whether it’s a weeknight craving or a quick holiday dessert, no-bake cheesecake jars deliver every time.
How to Make Perfect No-Bake Cheesecake Jars Every Time
Ingredients that balance flavor and convenience

The beauty of no-bake cheesecake jars is how forgiving and flexible they are. You don’t need anything fancy, just a few pantry staples and a fridge. The crust usually starts with crushed graham crackers and melted butter, pressed into the bottom of each jar. I love adding a pinch of cinnamon or brown sugar for that warm, nostalgic flavor.
For the filling, you’ll need softened cream cheese, a splash of vanilla extract, and either whipped cream or sweetened condensed milk to lighten it up. Some versions use Greek yogurt or mascarpone cheese for an extra creamy twist. You can also fold in lemon zest or crushed cookies to change things up.
As for toppings, fresh berries, fruit preserves, or chocolate ganache all work beautifully. In the summer, I reach for peach jam or sliced strawberries. In cooler months, crushed peppermint candy or cinnamon apples are delicious additions. You can even create layers with cookie crumbles, as seen in my no-bake protein cookies, which double as a mix-in for extra texture.
And don’t worry if you’re short on graham crackers, this recipe plays well with Oreo crumbs, vanilla wafers, or even gingersnaps. It’s all about building those creamy, crunchy layers that make these jars irresistible.
Step-by-step method for quick prep and chill
Start by prepping your jars (I use 6 to 8-ounce mason jars, but any small glass works). Spoon in your crust mixture and press it gently with the back of a spoon. Pop those into the fridge while you whip up the filling.
In a bowl, beat the softened cream cheese until smooth, then add your sweetener, usually powdered sugar or condensed milk, and vanilla. Fold in whipped cream or whipped topping until fully combined. Layer the filling over the crust, then top with jam, fruit, or whatever your heart desires.
The key to getting that perfect cheesecake texture? Letting them set in the fridge. You should chill your no-bake cheesecake jars for at least 4 hours, though overnight is even better. That’s when the flavors settle, and the filling firms up into that silky, sliceable texture we all love.
If you’re pressed for time, even 2 hours will give you something spoonable and satisfying, but longer chilling creates the best results. I recommend prepping them the night before if you’re making them for guests or a potluck.

And just like that, you’ve got creamy, layered no-bake cheesecake jars ready to enjoy. If you like easy recipes like this one, you’ll also want to check out my no-bake edible cookie dough for another fuss-free dessert option.
Storage, Shelf Life, and Smart Prep Tips
How long do cheesecake jars last in the fridge?
Once chilled and sealed, your no-bake cheesecake jars will stay fresh in the fridge for up to 5 days. Just be sure to use airtight containers, like mason jars with lids, to prevent them from absorbing fridge odors or drying out. If you’re using fresh fruit as a topping, I recommend adding that just before serving to keep it vibrant and juicy.
That said, I’ve been known to hide a couple in the back of the fridge for a late-night snack, and they’ve still tasted amazing on day four. The key is to keep them well covered and cold. If you’re making them for an event or party, prep them 24 hours in advance for the best texture and flavor.
These also work great as prep-ahead treats. When my week gets busy, I like to batch a few jars on Sunday night. That way, I have an easy dessert ready for lunchboxes, playdates, or those after-dinner cravings. They’re a nice change from cookies and a little more special than your usual yogurt cup.
You can even layer them with ingredients from other no-bake favorites, like the crust from my no-bake peanut butter oatmeal energy balls or the flavor combo of my butterfinger balls recipe. It’s like dessert meal-prep for the win.
Make-ahead, freeze, and jar size tips
Want to make a big batch and freeze them? You can, but with a little caution. No-bake cheesecake jars freeze best without fruit or jam toppings. Just assemble the crust and filling, seal tightly, and freeze for up to 2 weeks. To serve, let them thaw overnight in the fridge. The texture may be slightly softer, but still delicious.
For jar sizes, 4 to 8 ounces is the sweet spot. Smaller jars are perfect for kid-friendly portions or mini dessert bars, while larger jars are ideal for adults or date night. You can even use clear plastic cups with lids if you’re serving a crowd or taking them to a picnic.
If you’re using metal lids, just make sure the cheesecake has fully cooled before sealing to prevent condensation. And when stacking them in the fridge, place a paper towel between layers to avoid slippery jars.
I’ve also found that wide-mouth jars are easier for layering and scooping. And if you’re using jam or compote, spoon it over the filling just before serving for that beautiful glossy finish.*Common Mistakes and How to Avoid Them
Top no-bake cheesecake mistakes to watch out for

Even though no-bake cheesecake jars are simple, there are a few common pitfalls that can turn your dreamy dessert into a runny mess. The first (and most common) mistake? Skipping the chill time. These jars need at least 4 hours in the fridge to set properly. Any less, and you’ll have a soft filling that won’t hold its shape.
Another mistake is using cold cream cheese. It must be fully softened to room temperature, this ensures a smooth, lump-free filling. Trying to whip cold cream cheese leads to clumps, and no one wants that in a silky dessert.
Overmixing is another sneaky issue. If you whip the filling too long, you may lose the thick, creamy texture that makes no-bake cheesecake so satisfying. Mix until everything is combined and fluffy, then stop. Also, using low-fat or watery ingredients (like reduced-fat cream cheese or fruit with excess juice) can throw off your texture.
It’s also worth noting: don’t skimp on the crust. Pressing the crust mixture firmly into the jar helps it hold together and gives you that satisfying “crunch” under the cream. If it’s too loose, it turns into crumbs that float around.
If you’ve ever made a no-bake treat that didn’t set, it’s likely due to one of these issues. For other simple sweets that never fail, check out my no‑bake oatmeal desserts, they’re just as easy and forgiving.
Lining tins vs. jars: What you need to know
One of the best things about no-bake cheesecake jars? You don’t need to line anything. Traditional no-bake cheesecake recipes often call for lining tins with parchment to help with release. But with jars, there’s no flipping, no unmolding, no mess. You eat it straight out of the container.
This not only saves time but also makes cleanup a breeze, especially helpful for busy moms like me who don’t want to wash sticky springform pans at the end of a long day.
That said, if you’re making a full-sized no-bake cheesecake in a pan (not jars), then yes, lining the bottom with parchment can help with slicing and serving. But when it comes to jar desserts, there’s zero need for liners. Just layer, chill, and grab a spoon.
It’s one more reason why no-bake cheesecake jars are my go-to treat for potlucks, parties, and weekends when I just want a creamy, comforting dessert without the fuss.
Conclusion
No-bake cheesecake jars are one of those desserts that feel indulgent but take almost no effort. With just a few ingredients, a whisk, and some small jars, you can make something that’s creamy, customizable, and completely crave-worthy. Whether you’re prepping them for a party or sneaking one from the fridge after bedtime, these no-bake treats fit right into real-life schedules.
I love how these jars capture the heart of what dessert should be , simple, joyful, and made with love.
FAQ: No-Bake Cheesecake Jars
How long do you let no-bake cheesecake set in the fridge?
Ideally, chill your no-bake cheesecake jars for at least 4 hours. For best results, let them set overnight. This gives the filling enough time to firm up into that classic cheesecake texture.
What are common no-bake cheesecake mistakes?
The most common mistakes include not chilling long enough, using cold cream cheese, overmixing the filling, and under-pressing the crust. Avoid watery toppings and make sure your ingredients are at room temperature before mixing.
How long do cheesecake jars last in the fridge?
Properly sealed, cheesecake jars last up to 5 days in the fridge. Store them in airtight containers or jars with lids, and add fresh fruit toppings just before serving for best freshness.
Should you line a no-bake cheesecake tin?
For jars, no lining needed. If you’re using a traditional cake tin or springform pan, lining the bottom with parchment paper helps with easy release. But with jars, everything stays right where it should.