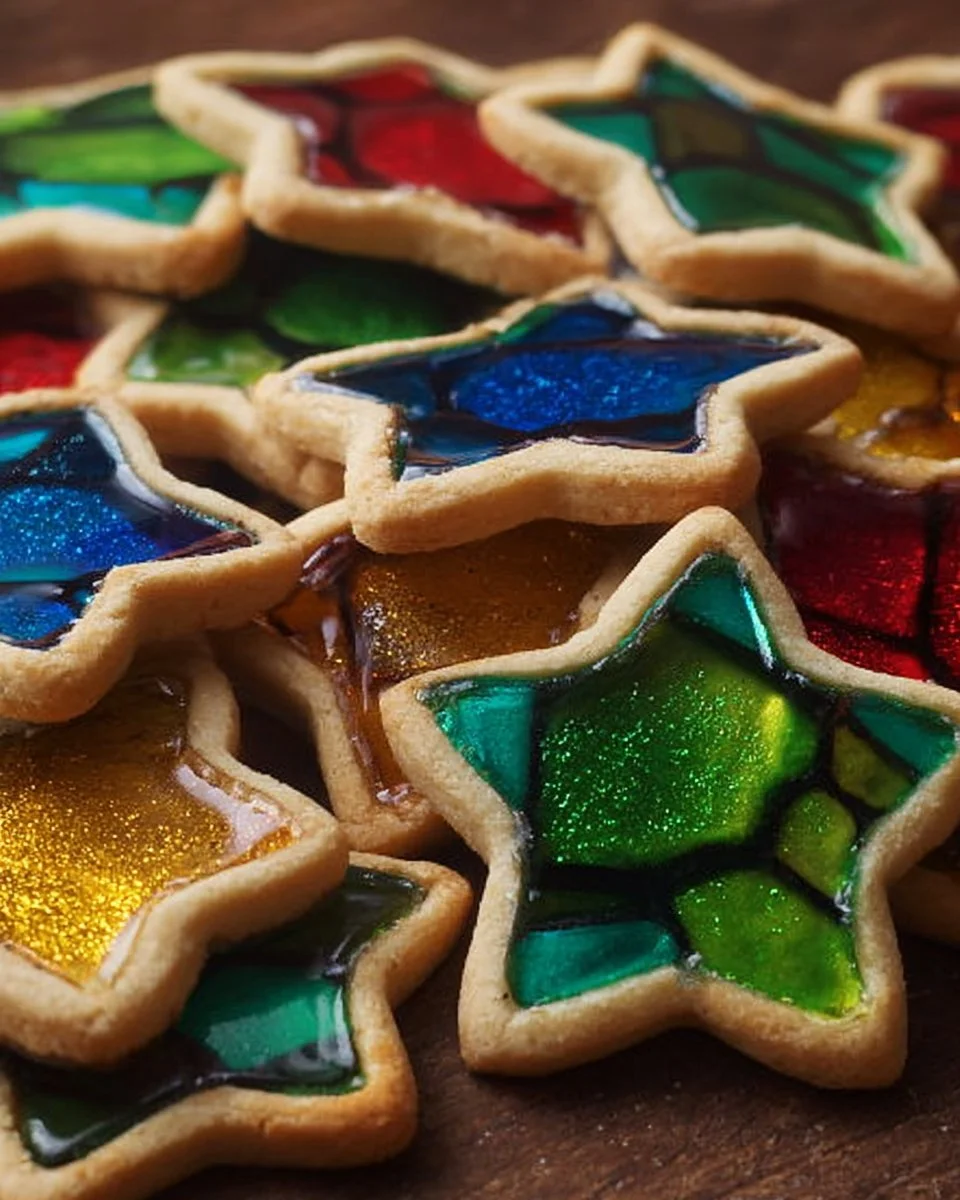
Stained glass cookies have been a delightful tradition in my kitchen, bringing color and charm to gatherings and special occasions. These gorgeous cookies not only look stunning but also taste divine with a buttery sweetness and a hint of vanilla. Perfect for holidays, parties, or simply a creative afternoon baking session with kids, they bring joy to both the maker and the eater. Let’s dive into why these cookies are a must-try!
Why You’ll Love This Dish
Imagine serving a platter of cookies that not only captivate the eyes but also delight the taste buds! Stained glass cookies are a blend of art and flavor, making them an ideal treat for festive celebrations or simple get-togethers. They are a fantastic way to get creative—kids love helping out, and you can customize them with different shapes and colors tailored to the occasion.
"These stained glass cookies were the highlight of our holiday party! The kids loved the colorful centers, and the adults couldn’t get enough of the buttery goodness." — A satisfied baker
With their vibrant appeal and sweet taste, these cookies are perfect for everything from holiday festivities to heartfelt family gatherings. Plus, they come together quickly with accessible ingredients. Whether you’re baking for a special occasion or just for fun, these cookies are sure to impress.
Preparing Stained Glass Cookies
Making stained glass cookies is a straightforward process that yields beautiful results. You’ll mix together simple ingredients to create a buttery dough, cut out fun shapes, and fill those shapes with colorful hard candy. In no time, you’ll have cookies that not only taste delicious but also add a decorative flair to your cookie platter.
What You’ll Need
- 2 3/4 cups all-purpose flour
- 1 teaspoon baking powder
- 1/2 teaspoon salt
- 1 cup unsalted butter, softened
- 1 cup granulated sugar
- 1 large egg
- 1 teaspoon vanilla extract
- 1 cup crushed hard candy (various colors)
Feel free to use different types of hard candy based on your color preference—everything from traditional candy canes to colorful Jolly Ranchers works well!
Directions to Follow
- Preheat your oven to 375°F (190°C).
- In a mixing bowl, combine the flour, baking powder, and salt. Mix until well blended.
- In a separate bowl, cream together the softened butter and granulated sugar until the mixture is light and fluffy.
- Add the egg and vanilla extract to the butter mixture and mix until fully integrated.
- Gradually add the dry flour mixture to the wet mixture, stirring until a cohesive dough forms.
- On a floured surface, roll out the dough to about 1/4 inch in thickness.
- Use cookie cutters to cut out shapes from the dough.
- Remove the center of each cookie using a smaller cutter to create a window for your candy.
- Fill the holes generously with crushed hard candy.
- Place the cookies on a baking sheet lined with parchment paper and bake for 8-10 minutes, or until the edges are lightly golden.
- Allow the cookies to cool completely on the baking sheet before transferring them to a wire rack.
How to Serve Stained Glass Cookies
These cookies are not just delicious; they are a feast for the eyes! Present them on a decorative platter or in a clear glass jar to showcase their colorful centers. Pair them with a glass of warm milk or a cup of tea for a classic combination. They also make lovely gifts when wrapped in clear cellophane and tied with a festive ribbon.
Keeping Leftovers Fresh
To ensure your stained glass cookies stay fresh, store them in an airtight container at room temperature. They’ll keep well for about a week. If you want to enjoy them longer, you can freeze them! Just make sure they’re completely cooled before placing them in a freezer-safe container. They can last for up to three months in the freezer.
Extra Advice
To elevate your stained glass cookies, try chilling the dough before rolling it out. This helps maintain their shape while baking. When it comes to crushing the hard candy, a zip-top bag and a rolling pin work wonders—just be sure to crush them well for the best effect!
Creative Twists
Feeling adventurous? Experiment with different flavorings in your dough, like almond or lemon extract, for a fun twist. You can also decorate the cooled cookies with royal icing for an added touch of sweetness and artistic flair. Consider trying seasonal colors—red and green for Christmas or pastels for Easter!
Frequently Asked Questions
How long does it take to make Stained Glass Cookies?
From start to finish, these cookies can take about 1-1.5 hours, including baking and cooling time.
Can I substitute the all-purpose flour?
Yes! For a gluten-free option, try a 1:1 gluten-free flour blend; just ensure that it’s suitable for baking.
What’s the best way to crush hard candy?
Place the candy in a zip-top bag and use a rolling pin to crush it into small pieces. This ensures even distribution in your cookies.
Stained glass cookies are the perfect blend of creativity and flavor, making them a go-to recipe for any occasion. With step-by-step guidance and a few personalized tips, you’ll be ready to impress your family and friends with this colorful confection!
Print
Stained Glass Cookies
- Total Time: 45 minutes
- Yield: 24 cookies 1x
- Diet: Vegetarian
Description
Delightful stained glass cookies that blend art and flavor, perfect for gatherings and special occasions.
Ingredients
- 2 3/4 cups all-purpose flour
- 1 teaspoon baking powder
- 1/2 teaspoon salt
- 1 cup unsalted butter, softened
- 1 cup granulated sugar
- 1 large egg
- 1 teaspoon vanilla extract
- 1 cup crushed hard candy (various colors)
Instructions
- Preheat your oven to 375°F (190°C).
- In a mixing bowl, combine the flour, baking powder, and salt. Mix until well blended.
- In a separate bowl, cream together the softened butter and granulated sugar until the mixture is light and fluffy.
- Add the egg and vanilla extract to the butter mixture and mix until fully integrated.
- Gradually add the dry flour mixture to the wet mixture, stirring until a cohesive dough forms.
- On a floured surface, roll out the dough to about 1/4 inch in thickness.
- Use cookie cutters to cut out shapes from the dough.
- Remove the center of each cookie using a smaller cutter to create a window for your candy.
- Fill the holes generously with crushed hard candy.
- Place the cookies on a baking sheet lined with parchment paper and bake for 8-10 minutes, or until the edges are lightly golden.
- Allow the cookies to cool completely on the baking sheet before transferring them to a wire rack.
Notes
Store cookies in an airtight container at room temperature for about a week or freeze them for up to three months.
- Prep Time: 15 minutes
- Cook Time: 10 minutes
- Category: Dessert
- Method: Baking
- Cuisine: American
Nutrition
- Serving Size: 1 cookie
- Calories: 150
- Sugar: 10g
- Sodium: 180mg
- Fat: 7g
- Saturated Fat: 4g
- Unsaturated Fat: 3g
- Trans Fat: 0g
- Carbohydrates: 22g
- Fiber: 0g
- Protein: 2g
- Cholesterol: 25mg
Keywords: cookies, stained glass, baking, holidays, desserts